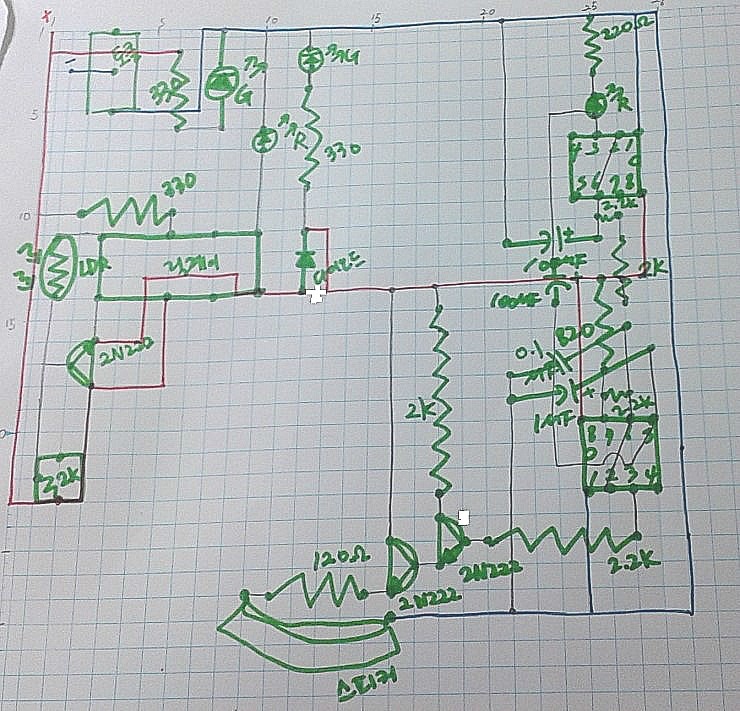
빛 감지 전자 주사위 작품/and..2016. 2. 8. 21:38
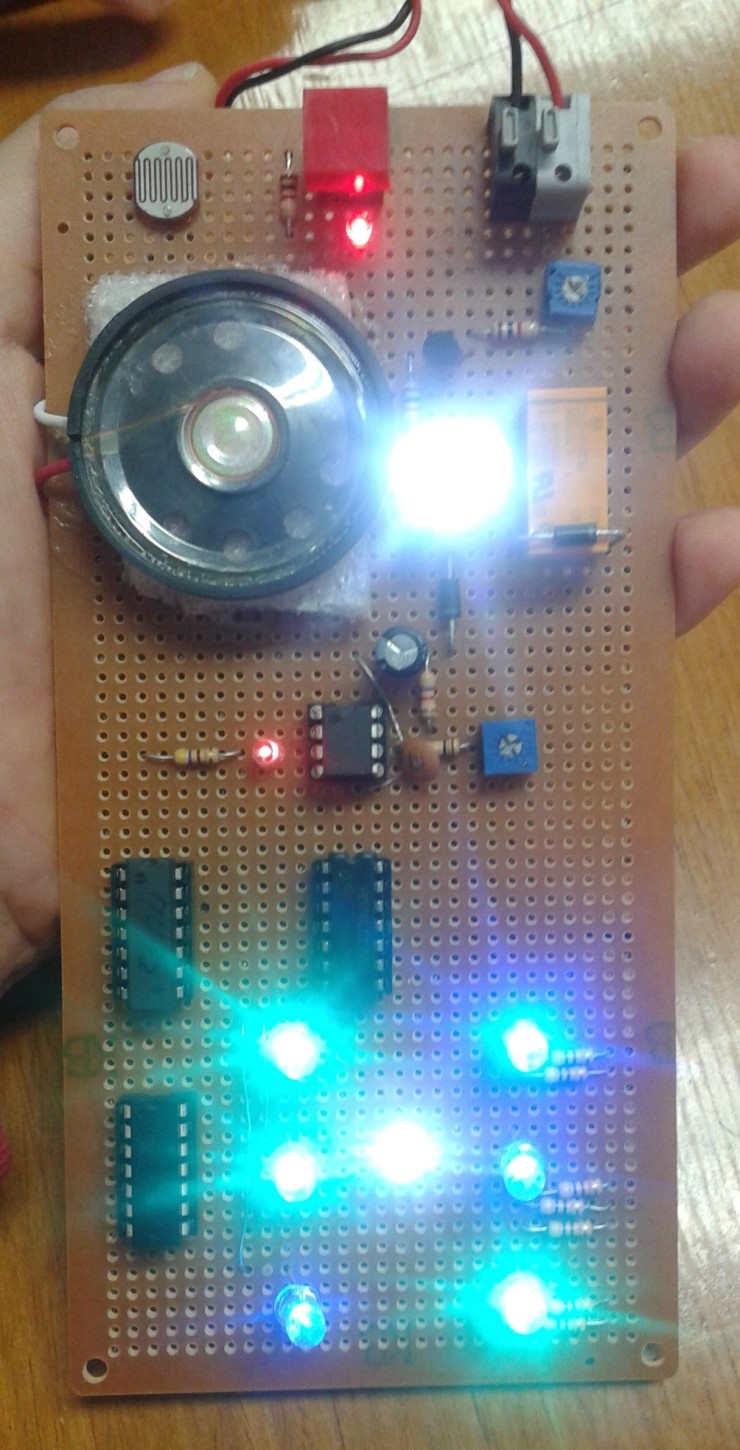
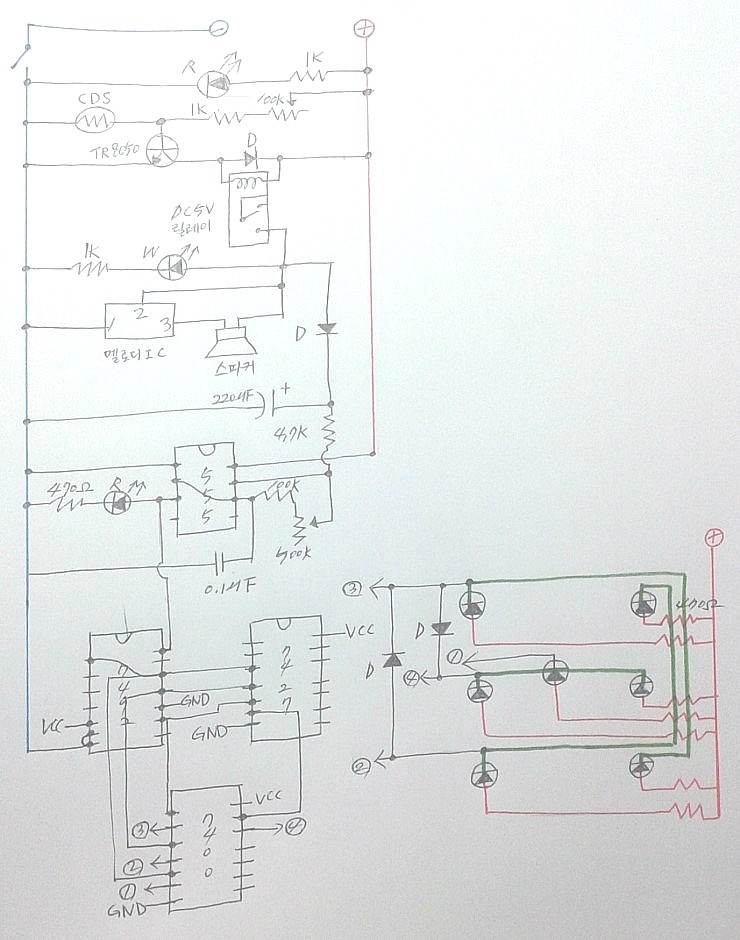
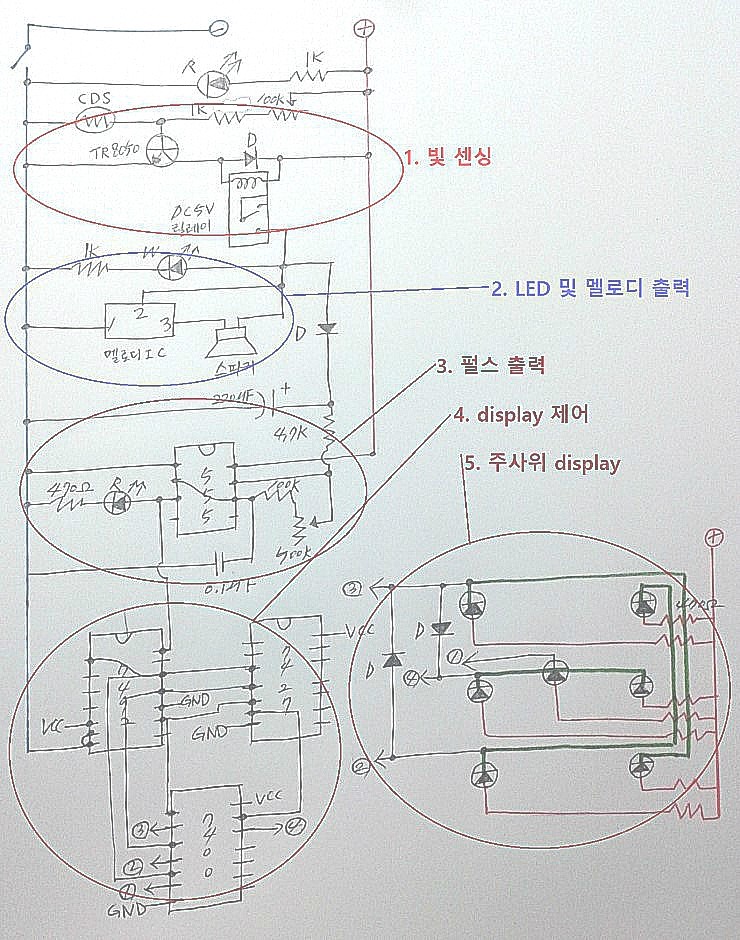
1. 빛 센싱

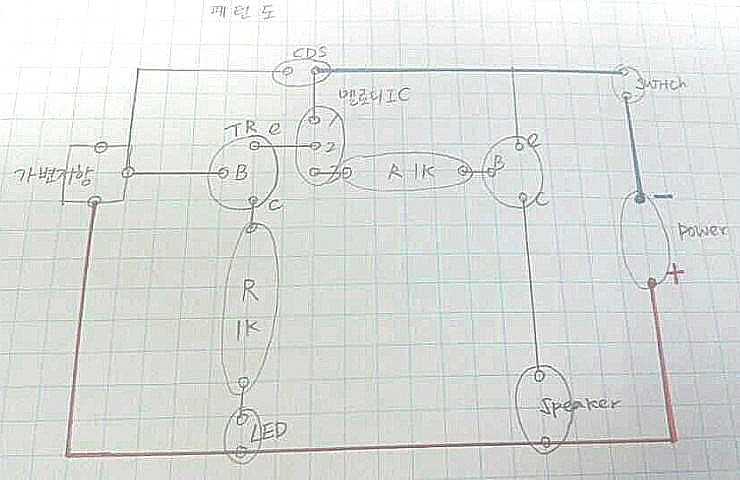
2. LED 및 멜로디 출력
http://pdf1.alldatasheet.co.kr/datasheet-pdf/view/125485/UTC/UM66T11L.html
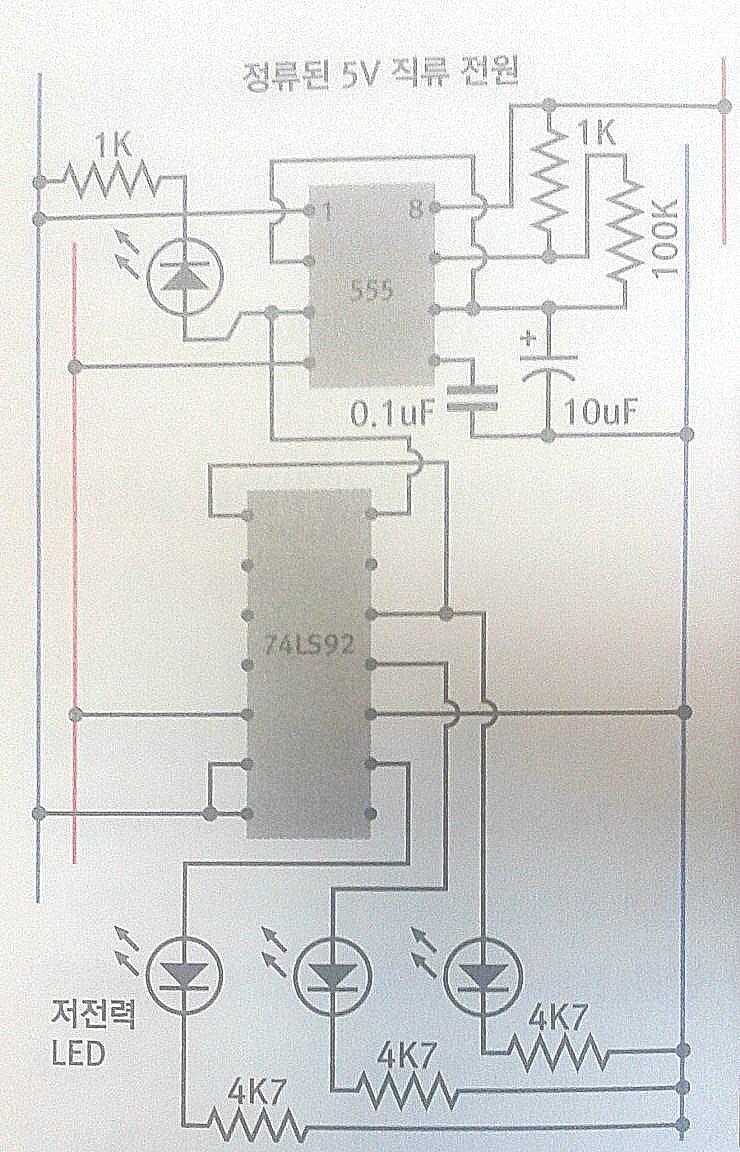


1. 빛 센싱


2. LED 및 멜로디 출력
http://pdf1.alldatasheet.co.kr/datasheet-pdf/view/125485/UTC/UM66T11L.html

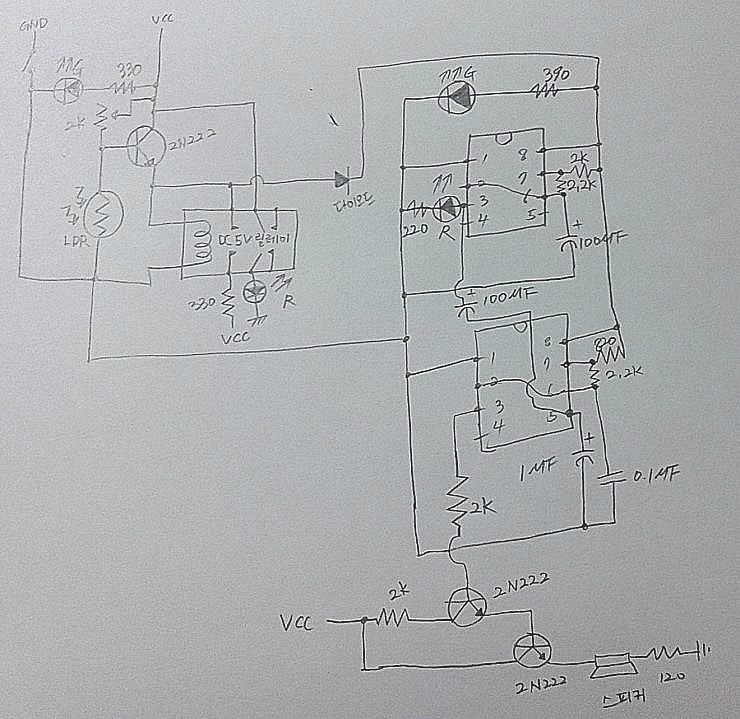
레이저 보안 경보장치
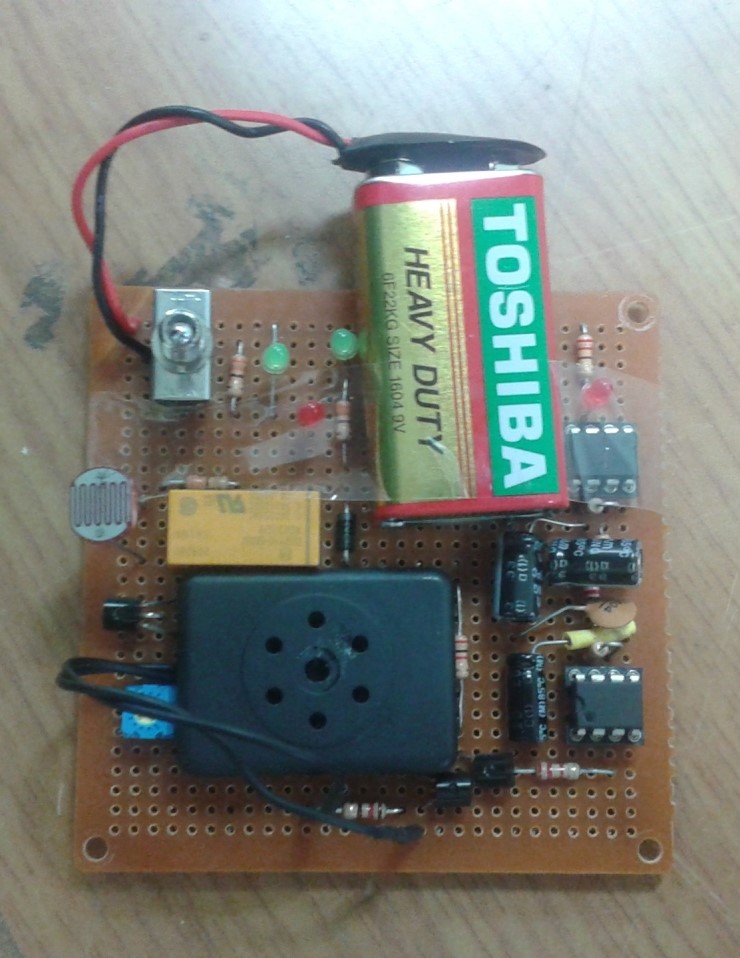
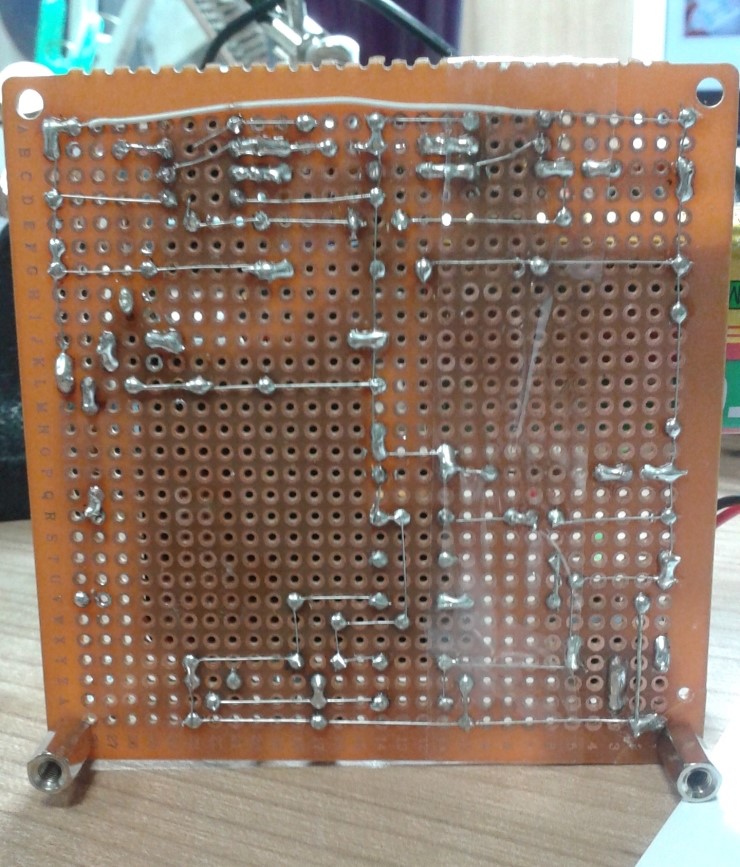
작동

| 디지털 시계 (0) | 2016.02.08 |
|---|---|
| 라인 트레이서 (0) | 2016.02.08 |
| 자동차 백 라이트 (0) | 2016.02.08 |
| 빛 감지 전자 주사위 (0) | 2016.02.08 |
| 레이저 보안 경보 장치 (0) | 2016.02.08 |
1. 프로젝트 만들기
-전체적인 설치 방법(리눅스)
http://webnautes.tistory.com/539
-error
http://stackoverflow.com/questions/29241640/errorunable-to-run-mksdcard-sdk-tool-in-ubuntu
2. 에뮬레이터 만들기
-virtual box 설치
http://www.2daygeek.com/install-upgrade-oracle-virtualbox-on-ubuntu-centos-debian-fedora-mint-rhel-opensuse/
-genymotion 설치
http://www.2daygeek.com/install-genymotion-android-emulator-on-ubuntu-centos-debian-fedora-mint-rhel-opensuse/#
-error
http://fishpoint.tistory.com/1669

3. 에뮬레이터에서 한글 출력하기
http://jpub.tistory.com/351

| Hello World! (버튼 이벤트 처리하기) (0) | 2016.04.19 |
|---|
제어 영상:
1 2 3 4 5 6 7 8 9 10 11 12 13 14 15 16 17 18 19 20 21 22 23 24 25 26 27 28 29 30 31 | import RPi.GPIO as GPIO import serial import time port = "/dev/ttyACM0" //아두이노와 통신하기 위해서 포트를 설정한다. serialToArduino = serial.Serial(port, 9600) // 9600으로 아두이노와 시리얼 통신을 한다. //스위치 핀들을 입력 모드로 설정한다. GPIO.setmode(GPIO.BCM) GPIO.setup(24, GPIO.IN) GPIO.setup(25, GPIO.IN) //아두이노에 보낼 변수들 message = "1500" endMark = 'E' print "Ready to communication!" //파일 시작을 알리는 글 while True: if(GPIO.input(25) == True): //25번 핀에 연결된 스위치를 누르면 message = "500" elif(GPIO.input(24) == True): //24번 핀에 연결된 스위치를 누르면 message = "2500" else: //아무것도 누르지 않으면 message = "1500" serialToArduino.writelines(message) //보내고 싶은 데이터를 보낸다. serialToArduino.write(endMark)//데이터의 마지막을 알린다. print(" sendind message: " + message + str(endMark) ) //사용자가 확인할 수 있도록 터미널 창에 뜨는 글 time.sleep(.5) |
1 2 3 4 5 6 7 8 9 10 11 12 13 14 15 16 17 18 19 20 21 22 23 24 25 26 27 28 29 30 31 32 33 34 35 36 37 38 39 40 | const int servo=2; int pw=1500; char char_value = 0; int int_value = 0; const char endMark = 'E'; void setup() { Serial.begin(9600); pinMode(servo, OUTPUT); } void loop() { if(Serial.available()) { char_value = Serial.read(); if(isDigit(char_value)) { int_value = (int_value*10) + (char_value - '0'); //each successive number is multiplied by 10. //for example, the value of the number 234 is 2*100 + 3*10 + 4. } else if(char_value == endMark) { pw = int_value; //storge the received value from RPi int_value = 0; //reset int_value to 0 ready for the next sequence of digits } } drive_servo(pw); //input the high pulse delay } void drive_servo(int val) { //period is 20ms. digitalWrite(servo, HIGH); delayMicroseconds(pw); digitalWrite(servo, LOW); delayMicroseconds(20000-pw); } |
| Serial To Arduino (0) | 2016.02.08 |
|---|---|
| Serial From Arduino (0) | 2016.02.08 |
| 아두이노 설치 (0) | 2016.02.08 |
이번에는 라즈베리에서 아두이노로 데이터를 보내보겠습니다.
라즈베리에서 온 신호를 아두이노에서 나타내기 위해 LCD를 사용했습니다.
라즈베리에서 신호가 오면 "Raspberry pi"라고 뜨고 신호가 없으면 "xxxxxxxxxxxx"라고 뜸니다.
1. 라즈베리 코드
import serial
import time
port = "/dev/ttyACM0"
serialToArduino = serial.Serial(port, 9600)
while True:
serialToArduino.writelines("Raspberry pi")
time.sleep(.5)
2. 아두이노 코드
#include <LiquidCrystal.h> //data that recieveed from RPi is represent on LCD attached on the arduino.
const int num_of_field = 12;
char value[num_of_field];
LiquidCrystal lcd(12, 11, 5,4, 3, 2);
void setup()
{
Serial.begin(9600);
lcd.begin(16,2);
}
void loop()
{
if(Serial.available()) //recieve date from RPi
{
delay(20); //for exact save
for(int i = 0; i<num_of_field; i++)
{value[i] = Serial.read();} //str storage
print_on_LCD();
delay(500); //depend eye effect, if this no, the data isn't seen due to so fast.
}
else
{
for(int i = 0; i<num_of_field; i++)
{value[i] = 'x';} //sign no data come
print_on_LCD();}
}
void print_on_LCD()
{
for(int i = 0; i<num_of_field; i++)
{ lcd.setCursor(i, 0);
lcd.print(value[i]);}
}
3. 라즈베리 파이썬 파일 실행
LXTerminal창 켜고
cd ~ 저장해놓은 디렉터리 주소
sudo python 저장해놓은 파일이름.py
참고
http://blog.oscarliang.net/raspberry-pi-and-arduino-connected-serial-gpio/
[출처] [시리얼 통신] - Serial To Arduino|작성자 DEW
| 서보모터 제어하기 from raspberry To Arduino (3) | 2016.02.08 |
|---|---|
| Serial From Arduino (0) | 2016.02.08 |
| 아두이노 설치 (0) | 2016.02.08 |
라즈베리 파이와 아두이노가 소통하는 방식은 시리얼 통신인데요.
우선 아두이노가 0~255까지 숫자를 보내면 라즈베리가 그 숫자를 읽어서 커맨드라인에 표시되게 해보겠습니다.
1. 라즈베리에 파이썬 시리얼 모듈 설치
아두이노의 내장 되어있는 Serial 내장 라이브러리와 라즈베리의 pySerial 파이썬 모듈이 사용되요.
라즈베리의 시리얼 모듈은 수동으로 설치해야 하기때문에 다음을 입력합니다.
sudo apt-get install python-serial python3-serial
2. 아두이노 코드
아두이노 IDE를 열고 코드를 다음 코드를 아두이노에 업로드합니다.
void setup()
{Serial.begin(9600);}
void loop()
{
for(int n = 0; n<255; n++)
{ Serial.println(n, DEC);
delay(50);
}
}
3. 라즈베리 코드
다음 코드를 Serial_read.py로 저장합니다.
import serial
port = "/dev/ttyACM0"
serialFromArduino = serial.Serial(port, 9600) //아두이노에 연결된 시리얼 포트를 연다.
while True:
input1 = serialFromArduino.readline() //문자열 전체를 입력 변수로 읽어온다
print (input1) //출력한다.
4. 라즈베리 코드 실행
파이썬 파일을 실행하기 위해서 LXTerminal 창에 다음을 칩니다.
sudo cd /home/pi/BQT //Serial.read.py를 저장한 폴더
sydo python Serial.read.py //코드 실행
멈추려면 Ctrl + C
[출처] [시리얼 통신] - Serial From Arduino |작성자 DEW
| 서보모터 제어하기 from raspberry To Arduino (3) | 2016.02.08 |
|---|---|
| Serial To Arduino (0) | 2016.02.08 |
| 아두이노 설치 (0) | 2016.02.08 |
1. 아두이노 IDE를 설치
라즈베리 파이에 아두이노 IDE를 설치하려면 다음을 입력한다.
sudo apt-get update
sudo apt-get install arduino
아두이노 환경이 프로그램 메뉴의 Electronic섹션에 등장한다.
아직은 실행 하면 안된다!!
2. 시리얼 포트 접근 권한 설정
아두이노를 빈 USB포트에 끼우고 다음을 입력한다.
sudo usermod -a -G tty pi
sudo usermod -a -G dialout pi
3. 아두이노 실행
이제 아두이노를 실행한다.
Tools -> Serial Port를 클릭하고 시리얼 포트를 선택한뒤, 아두이노 보드의 종류를 선택한다.
Blink 예제를 업로드 해 본다.
[출처] [설치] - 라즈비안에서 아두이노 설치하기|작성자 DEW
| 서보모터 제어하기 from raspberry To Arduino (3) | 2016.02.08 |
|---|---|
| Serial To Arduino (0) | 2016.02.08 |
| Serial From Arduino (0) | 2016.02.08 |
“Gordons Projects”라는 블로그에서 C언어를 지원하는 “wiringPi” 라이브라리를 사용할 것이다.
내가 이것을 배운 출처는 http://www.rasplay.org/?p=3241
1. wiringPi 라이브러리 설치하기
소스관리툴 git 다운로드
sudo apt-get install git-core
wiringPi 프로젝트를 통째로 받아온다.
git clone git://git.drogon.net/wiringPi
빌드 및 설치 진행
cd wiringPi
./build
설치가 잘 되었는지 확인
gpio -v gpio readall
2. 작업 폴더 및 .c파일 생성
File manager에서 /home/pi에 c_lang이라는 디렉터리를 만들었다.
c_lang 디렉터리 안에 c_lang_GPIO_OUTPUT.c라는 파일을 만들었다.
c파일 안에 다음 코드를 넣는데, 이 코드는 4번(#23) 5번(#24) 출력의 LED를 켜도록 한다.

1 2 3 4 5 6 7 8 9 10 11 12 13 14 15 16 17 18 19 20 21 22 23 24 25 26 27 28 | #include <stdio.h> #include <wiringPi.h> #define LED1 4 // BCM_GPIO 23 #define LED2 5 // BCM_GPIO 24 int main (void) { if (wiringPiSetup () == -1) return 1 ; pinMode (LED1, OUTPUT) ; pinMode (LED2, OUTPUT) ; for (;;) { digitalWrite (LED1, 1) ; // On digitalWrite (LED2, 1) ; // On delay (1000) ; // ms digitalWrite (LED1, 0) ; // Off digitalWrite (LED2, 0) ; // Off delay (1000) ; } return 0 ; } |
3. 프로그램 컴파일
파일을 저장한 디렉터리로 들어가서
cd /home/pi/c_lang
다음 컴파일 명령을 실행해 주면 c_lang_GPIO_OUTPUT 이라는 실행파일이 생성된다.
gcc -o c_lang_GPIO_OUTPUT c_lang_GPIO_OUTPUT.c -lwiringPi
4. 프로그램 실행
sudo ./c_lang_GPIO_OUTPUT
프로그램 종료는 Ctrl + C
| 사운드 보드(파이썬) (0) | 2016.02.08 |
|---|---|
| GPIO 입력(파이썬) (0) | 2016.02.08 |
| GPIO 출력(쉘 스크립트, 파이썬 이용) (0) | 2016.02.08 |
| GPIO 설치하고 테스트하기 (0) | 2016.02.08 |
이제 버튼을 누르면 녹음된 소리를 재생해주는 사운드 보드를 만들어 보자.
사운드 보드를 만드려면 .wav형식의 소리파일이 필요하다.
여러가지 재미있는 소리를 첨부파일에 올려놓았으니 이용하세요~~
1. 홈 디렉터리에 새로운 디렉터리를 만든다. 디렉터리명은 soundboard
만든 폴더에 새로운 파일 하나를 만든다. soundboard.py
첨부한 소리파일도 soundboard 디렉터리에 넣는다.
2. soundboard.py파일을 열고 코드 입력
import pygame.mixer
from time import sleep
import RPi.GPIO as GPIO
from sys import exit
GPIO.setmode(GPIO.BCM)
GPIO.setup(25, GPIO.IN)
GPIO.setup(24, GPIO.IN)
GPIO.setup(23, GPIO.IN)
GPIO.setup(18, GPIO.IN)
GPIO.setup(22, GPIO.IN)
GPIO.setup(27, GPIO.IN)
GPIO.setup(17, GPIO.IN)
pygame.mixer.init(48000, -16, 1, 1024) //파이게임의 믹서 초기화
soundA = pygame.mixer.Sound("/home/pi/soundboard/robot_explode.wav") //소리 로드
soundB = pygame.mixer.Sound("/home/pi/soundboard/drumsolo.wav")
soundC = pygame.mixer.Sound("/home/pi/soundboard/laugh.wav")
soundD = pygame.mixer.Sound("/home/pi/soundboard/playgame.wav")
soundE = pygame.mixer.Sound("/home/pi/soundboard/drumLick.wav")
soundF = pygame.mixer.Sound("/home/pi/soundboard/piano4.wav")
soundG = pygame.mixer.Sound("/home/pi/soundboard/drum1.wav")
soundChannelA = pygame.mixer.Channel(1) //7개채널설정. 서로 다른 소리를 동시에 재생할 수 있도록 소리 하나에 채널 하나씩
soundChannelB = pygame.mixer.Channel(2)
soundChannelC = pygame.mixer.Channel(3)
soundChannelD = pygame.mixer.Channel(4)
soundChannelE = pygame.mixer.Channel(5)
soundChannelF = pygame.mixer.Channel(6)
soundChannelG = pygame.mixer.Channel(7)
print "Soundboard Ready." //사운드보드의 준비 완료 상태 표시
while True:
try:
if(GPIO.input(25) == True): //핀에 HIGH 신호가 입력되면 다음 행 실행
soundChannelA.play(soundA) //소리 재생
if(GPIO.input(24) == True):
soundChannelA.play(soundB)
if(GPIO.input(23) == True):
soundChannelA.play(soundC)
if(GPIO.input(18) == True):
soundChannelA.play(soundD)
if(GPIO.input(22) == True):
soundChannelA.play(soundE)
if(GPIO.input(27) == True):
soundChannelA.play(soundF)
if(GPIO.input(17) == True):
soundChannelA.play(soundG)
sleep(.01)
except KeyboardInterrupt: //사용자가 Ctrl + C를 누를 때 아무런 메시지도 보여주지 않고 깔끔하게 스크립트가 종료됨
exit()
3. 커맨드라인에서 cd /home/pi/soundboard 를 입력하여 soundboard.py를 저장한 폴더로 이동하여 소스파일을 실행한다.
pi@ raspberrypi ~ /soundboard $ sudo python soundboard.py
4. "Soundboard Ready"라는 메시지 확인 후 버튼을 누르면 샘플 소리 재생
5. 라즈베리 파이 설정에 따라 소리파일 출력이 HDMI를 통해 출력 될수도 있고 오디오 잭을 통해 출력 될 수도 있다.
출력 방향을 변경하려면 Ctrl + C를 눌러 스크립트를 빠져나와서 다음 명령을 실행하면 오디오 출력 단자를 사용할 수 있다.
pi@ raspberrypi ~/soundboard $ sudo amixer cset numid=3 1
오디오를 HDMI모니터로 출력하려면 다음 구문 입력
pi@ raspberrypi ~/soundboard $ sudo amixer cset numid=3 2
| C언어를 이용한 GPIO 출력 (wiringPi ) (0) | 2016.02.08 |
|---|---|
| GPIO 입력(파이썬) (0) | 2016.02.08 |
| GPIO 출력(쉘 스크립트, 파이썬 이용) (0) | 2016.02.08 |
| GPIO 설치하고 테스트하기 (0) | 2016.02.08 |